The 5 PM scramble. You’re tired, you’re hungry, and the last thing you want to do is spend an hour in the kitchen. We’ve all been there. Your stomach is rumbling, your family is asking (what’s for dinner?) and the siren song of expensive, unhealthy takeout is getting louder by the minute. It feels like a choice between your time and a good meal. But what if you could have both? What if you could have a delicious, wholesome, home-cooked meal on the table in less time than it takes to choose a movie on Netflix?
Welcome to the solution you’ve been searching for. This is your ultimate guide to the world of satisfying 15-minute meals. Forget the stress, the mess, and the complicated recipes. We’re here to prove that a time crunch doesn’t have to mean a compromise on flavor or health. These quick dinner recipes are specifically designed for your busy life. They are simple to execute, require minimal cleanup, and use easy-to-find ingredients that won’t have you running to a specialty store. It’s time to reclaim your weeknights and fall in love with cooking again, one speedy, spectacular meal at a time.

Table of Contents
15-Minute Meals
The Anatomy of a Perfect 15-Minute Meal
So, what’s the magic behind getting a meal on the table in just 15 minutes? It’s not about rushing or cutting corners; it’s about being smart and strategic. The philosophy is simple: combine high-impact, quick-cooking ingredients with efficient techniques. By understanding the core principles, you can turn almost any flavor profile into a rapid-fire feast. This approach empowers you to be a more intuitive and faster cook, establishing you as the master of your own kitchen schedule.
Smart Ingredients are Key: The Building Blocks of Speed
The foundation of any successful 15-minute meal is a well-chosen roster of ingredients. Your grocery list is your playbook. By stocking your pantry, fridge, and freezer with items that cook quickly, you’ve already won half the battle.
- Quick-Cooking Proteins: These are your power players. Think shrimp, which cooks in 2-3 minutes; thin-cut chicken breasts or ground meats like turkey or beef that brown in minutes; and plant-based heroes like canned beans, lentils, and tofu.
- Pre-Chopped or Frozen Vegetables: Don’t underestimate the power of the prep work that’s already been done for you. Bagged broccoli florets, pre-sliced mushrooms, baby spinach that wilts in seconds, and frozen peas or corn can be added directly to the pan, saving you precious chopping time.
- Fast-Cooking Grains & Carbs: Not all carbs are created equal when it comes to speed. Lean on grains like couscous, which just needs to be steeped in hot water for 5 minutes. Quick-cook quinoa, instant rice, and fresh pasta or gnocchi are also fantastic time-savers.
- Flavor-Packed Sauces & Condiments: This is your secret weapon for instant flavor. A spoonful of pesto, a drizzle of soy sauce, a dollop of hummus, or a scoop of your favorite salsa can transform simple ingredients into a gourmet experience with zero extra effort.
Essential Time-Saving Tools: Your Kitchen Arsenal
You don’t need a professional kitchen, but a few key tools can dramatically speed up your workflow and make the cooking process smoother and more enjoyable.
- A Sharp Chef’s Knife: A sharp knife is a safe knife and a fast one. It makes quick work of any chopping you do need to tackle.
- A Large Skillet or Wok: A larger surface area allows you to cook ingredients more evenly and quickly without overcrowding the pan, which can steam your food instead of searing it.
- A Food Processor or Blender: For making lightning-fast sauces, dressings, or chopping aromatics like garlic and onion in seconds.
- Kitchen Shears: Surprisingly versatile, you can use them to snip fresh herbs directly into the pan, cut up chicken, or even slice pizza.
Our Top 5 Fail-Proof 15-Minute Meals
Let’s get cooking! It’s time to put theory into practice. Here are five of our absolute favorite, go-to 15-minute meals that have been tested and approved by busy people and hungry families. These recipes are designed to be templates feel free to swap out vegetables or proteins based on what you have on hand!
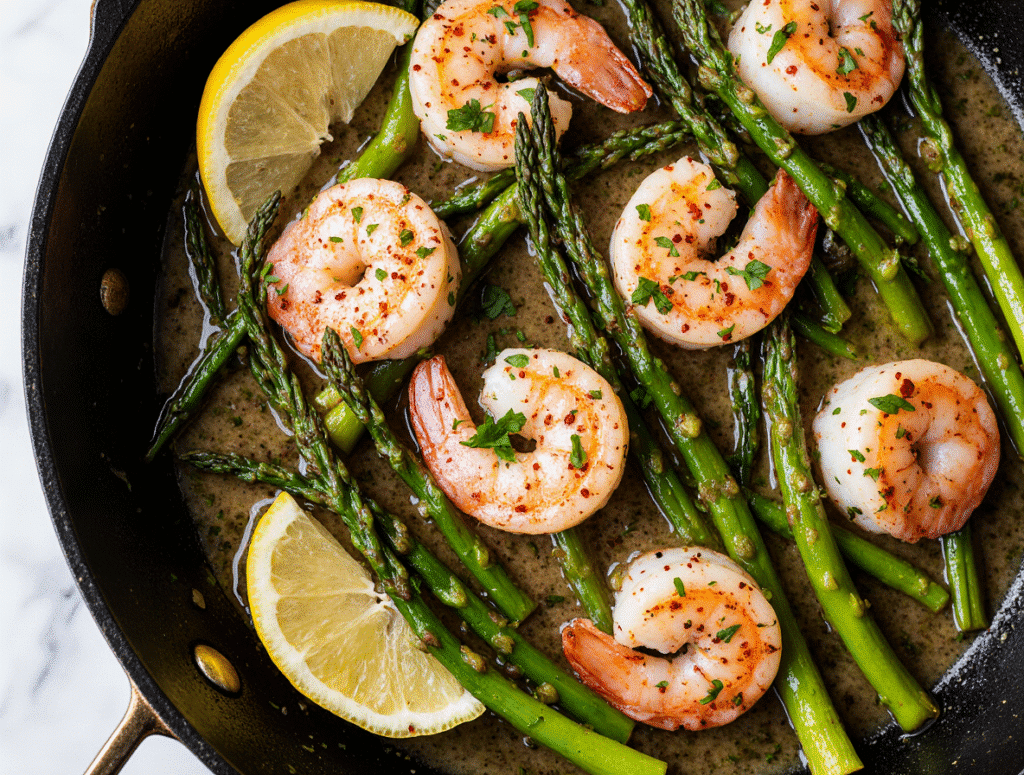
Recipe 1: Speedy Garlic Shrimp & Asparagus Skillet

Ingredients
| Ingredient | Quantity | Notes |
|---|---|---|
| Large Shrimp | 1 lb | Peeled & deveined |
| Asparagus | 1 bunch | Trimmed & cut into 2-inch pieces |
| Garlic | 4-5 cloves | Finely minced or pressed |
| Olive Oil | 2 tbsp | Extra virgin |
| Lemon | 1 | For juice and zest |
| Red Pepper Flakes | 1/4 tsp | Adjust to your spice preference |
| Salt & Black Pepper | To taste | Freshly ground is best |
| Fresh Parsley | 2 tbsp | Optional, for garnish |
Step-by-Step Preparation
- Prep the Pan: Heat the olive oil in a large skillet or wok over medium-high heat. While it’s heating, ensure your shrimp are patted dry with a paper towel this is crucial for getting a good sear.
- Cook the Asparagus: Add the trimmed asparagus pieces to the hot skillet. Sauté for 3-4 minutes, stirring occasionally, until they are tender but still have a slight crispness.
- Bloom the Aromatics: Add the minced garlic and red pepper flakes to the skillet. Stir constantly for about 30 seconds until the garlic is fragrant. Be careful not to let it burn!
- Sear the Shrimp: Push the asparagus to one side of the pan and add the shrimp in a single, even layer. Let them cook undisturbed for 1-2 minutes per side. They’re done when they turn pink and opaque.
- Bring It All Together: Stir the shrimp and asparagus together. Remove the skillet from the heat. Squeeze the juice of half the lemon over the entire dish and add the lemon zest. Season generously with salt and pepper, garnish with fresh parsley, and serve immediately.
Pro Cooking Tips
- Don’t Overcrowd the Pan: If your skillet isn’t large enough, the ingredients will steam instead of sear. Cook in two batches if necessary to ensure everything gets nicely browned.
- High Heat is Your Friend: For shrimp and quick-cooking vegetables, high heat cooks them fast and locks in flavor and texture.
- Flavor Boost: For a deeper, richer flavor, deglaze the pan with a splash of dry white wine or chicken broth right after the garlic becomes fragrant.
What to Serve With It
This skillet is fantastic on its own for a low-carb meal. To make it more substantial, serve it over a bed of instant couscous, alongside a piece of crusty baguette for soaking up the delicious garlic sauce, or with a simple side salad.
Storage and Reheating
Store leftovers in an airtight container in the refrigerator for up to 2 days. To reheat, gently warm in a skillet over low heat for a few minutes until just warmed through. Avoid the microwave, as it can make the shrimp rubbery.
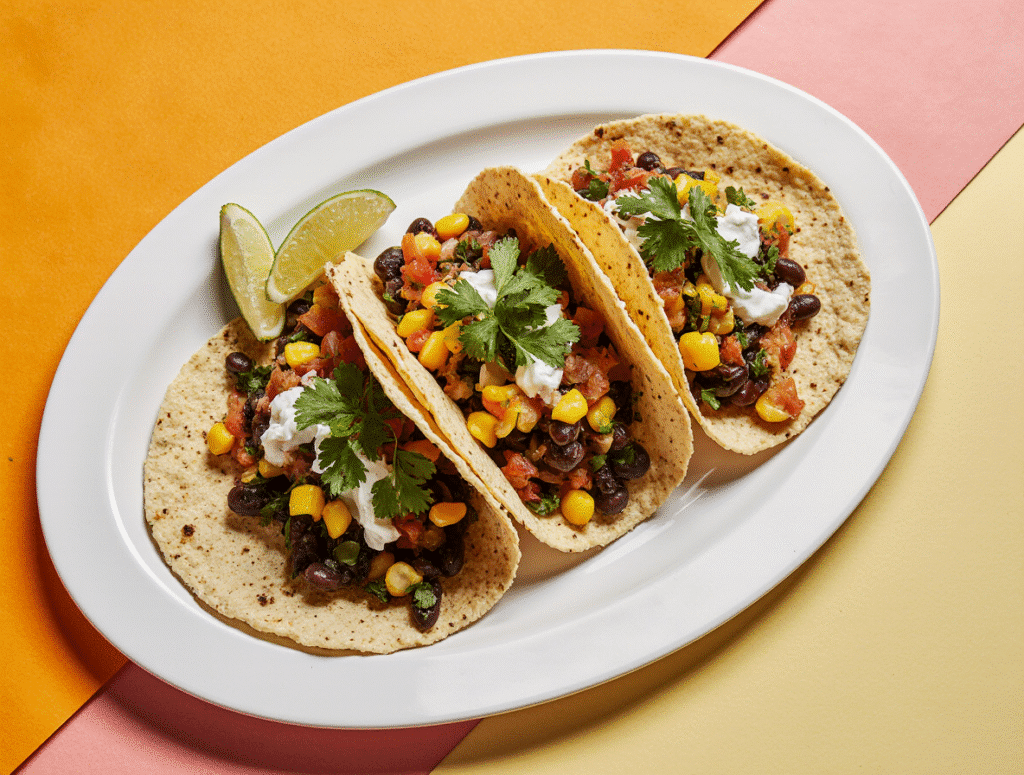
Recipe 2: 15-Minute Black Bean & Corn Salsa Tacos (Vegetarian)

Ingredients
| Ingredient | Quantity | Notes |
|---|---|---|
| Canned Black Beans | 1 (15-oz) can | Rinsed and drained |
| Frozen or Canned Corn | 1 cup | Thawed if frozen, drained if canned |
| Red Onion | 1/2 | Finely diced |
| Cilantro | 1/2 cup | Roughly chopped |
| Lime | 1 | Juiced |
| Cumin | 1 tsp | |
| Chili Powder | 1/2 tsp | |
| Corn or Flour Tortillas | 8 small | |
| Avocado | 1 | Sliced or mashed |
| Cotija or Feta Cheese | 1/4 cup | Crumbled (optional) |
Step-by-Step Preparation
- Make the Salsa Filling: In a medium bowl, combine the rinsed black beans, corn, diced red onion, and chopped cilantro.
- Season It: Add the cumin, chili powder, and the juice of the entire lime. Stir everything together until well combined. Season with salt and pepper to your liking.
- Warm the Tortillas: Heat a dry skillet over medium heat. Warm the tortillas for about 30 seconds per side until they are soft and pliable. You can also wrap them in a damp paper towel and microwave for 30-45 seconds.
- Assemble the Tacos: Spoon the black bean and corn salsa mixture generously into the warm tortillas.
- Add Toppings: Top with sliced avocado, a sprinkle of cotija or feta cheese, and an extra squeeze of lime if desired. Serve immediately.
Pro Cooking Tips
- Rinse Your Beans: Rinsing canned beans removes excess sodium and improves their flavor and texture.
- Add a Creamy Element: For a creamier texture, mash half of the black beans with a fork before mixing them with the other ingredients.
- Spice It Up: Add a finely diced jalapeño or a dash of your favorite hot sauce to the salsa for an extra kick.
What to Serve With It
These tacos are a complete meal, but a side of quick-cook Spanish rice or a simple dollop of sour cream or Greek yogurt would be a great addition.
Storage and Reheating
The black bean and corn salsa can be stored in an airtight container in the fridge for up to 3 days (it gets even better as the flavors meld!). It’s best to assemble the tacos fresh to prevent them from getting soggy.
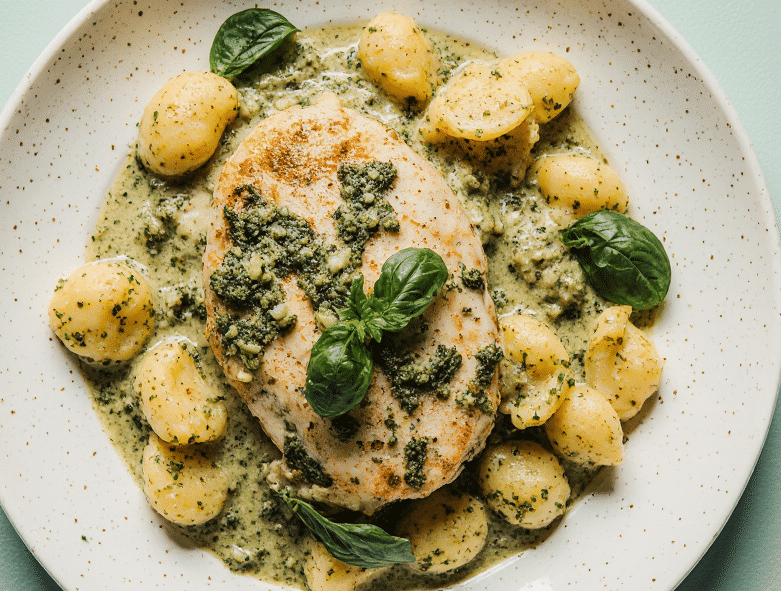
Recipe 3: Creamy Pesto Chicken & Gnocchi
Ingredients
| Ingredient | Quantity | Notes |
|---|---|---|
| Shelf-Stable Gnocchi | 1 (1-lb) package | Potato gnocchi |
| Chicken Breast | 1 lb | Cut into 1-inch cubes |
| Basil Pesto | 1/2 cup | Good quality, store-bought |
| Heavy Cream or Half-and-Half | 1/2 cup | |
| Cherry Tomatoes | 1 pint | Halved |
| Baby Spinach | 2 large handfuls | |
| Olive Oil | 1 tbsp | |
| Grated Parmesan | 1/4 cup | For serving |
Step-by-Step Preparation
- Cook the Gnocchi: Bring a pot of salted water to a boil. Add the gnocchi and cook according to package directions usually until they float to the surface (about 2-3 minutes). Drain, reserving about 1/2 cup of the cooking water.
- Cook the Chicken: While the water boils, heat olive oil in a large skillet over medium-high heat. Add the cubed chicken, season with salt and pepper, and cook for 5-7 minutes, stirring occasionally, until golden brown and cooked through.
- Create the Sauce: Reduce the heat to low. Stir in the pesto and heavy cream until a smooth sauce forms. If it’s too thick, add a splash of the reserved gnocchi water.
- Wilt the Greens: Add the halved cherry tomatoes and baby spinach to the skillet. Stir for 1-2 minutes until the spinach has wilted and the tomatoes have softened slightly.
- Combine and Serve: Add the cooked, drained gnocchi to the skillet. Toss everything together to coat in the creamy pesto sauce. Serve immediately, topped with a generous sprinkle of grated Parmesan cheese.
Pro Cooking Tips
- Don’t Overcook Gnocchi: Gnocchi cooks very quickly. The moment they float, they’re ready. Overcooking will make them mushy.
- Save Pasta Water: The starchy gnocchi cooking water is liquid gold. It helps the sauce cling to the gnocchi and creates a silkier texture.
- Pan-Sear the Gnocchi: For a different texture, after boiling, pan-sear the gnocchi in a little butter or oil until golden brown before adding them to the sauce.
What to Serve With It
This is a hearty, all-in-one meal. A simple green salad with a light vinaigrette would be the perfect fresh counterpoint to the rich, creamy sauce.
Storage and Reheating
Store in an airtight container for up to 3 days. Reheat in a skillet over low heat, adding a splash of milk or cream to loosen the sauce if needed.
Recipe 4: Quick Sesame Ginger Beef & Broccoli
Ingredients
| Ingredient | Quantity | Notes |
|---|---|---|
| Flank or Sirloin Steak | 1 lb | Thinly sliced against the grain |
| Broccoli Florets | 3 cups | Fresh or frozen |
| Soy Sauce | 1/4 cup | Low sodium |
| Sesame Oil | 1 tbsp | Toasted |
| Fresh Ginger | 1 tbsp | Grated |
| Fresh Garlic | 2 cloves | Minced |
| Honey or Maple Syrup | 1 tbsp | |
| Cornstarch | 1 tsp | |
| Vegetable Oil | 2 tbsp | |
| Sesame Seeds | For garnish |
Step-by-Step Preparation
- Make the Sauce: In a small bowl, whisk together the soy sauce, sesame oil, grated ginger, minced garlic, honey, and cornstarch until the cornstarch is fully dissolved. This is your stir-fry sauce.
- Sear the Beef: Heat 1 tablespoon of vegetable oil in a large skillet or wok over high heat. Add the thinly sliced beef in a single layer (work in batches if needed) and sear for 1-2 minutes per side until browned but still slightly pink inside. Remove the beef from the skillet and set aside.
- Cook the Broccoli: Add the remaining tablespoon of vegetable oil to the skillet. Add the broccoli florets and 2 tablespoons of water. Cover and steam for 2-3 minutes until tender-crisp.
- Combine: Uncover the skillet, return the beef to the pan with the broccoli.
- Sauce and Serve: Pour the prepared stir-fry sauce over the beef and broccoli. Stir everything together for 1-2 minutes until the sauce thickens and coats everything beautifully. Serve immediately over rice or noodles, garnished with sesame seeds.
Pro Cooking Tips
- Slice Beef Thinly: For ultra-tender beef, place it in the freezer for 15-20 minutes before slicing. This firms it up, making it easier to slice thinly against the grain.
- High Heat for Stir-Frying: The key to a great stir-fry is very high heat. This cooks everything quickly, keeping the vegetables crisp and the meat tender.
- The Cornstarch Slurry: The cornstarch in the sauce is what creates that classic, glossy, thick stir-fry sauce. Make sure it’s fully dissolved before adding it to the hot pan to avoid lumps.
What to Serve With It
Serve this classic dish over a bed of fluffy instant rice, quinoa, or your favorite ramen noodles.
Storage and Reheating
Store leftovers in an airtight container for up to 3 days. Reheat in a skillet over medium heat or in the microwave.
Recipe 5: 5-Ingredient Sun-Dried Tomato & Spinach Pasta
Ingredients
| Ingredient | Quantity | Notes |
|---|---|---|
| Fresh Pasta (e.g., Angel Hair or Tagliatelle) | 1 lb | Cooks faster than dried |
| Jarred Sun-Dried Tomatoes in Oil | 1/2 cup | Drained and chopped, reserve the oil |
| Garlic | 3 cloves | Thinly sliced |
| Baby Spinach | 5 oz | |
| Feta or Goat Cheese | 4 oz | Crumbled |
Step-by-Step Preparation
- Cook the Pasta: Bring a large pot of salted water to a boil. Cook the fresh pasta according to package directions (usually only 2-4 minutes). Before draining, reserve about 1 cup of the starchy pasta water.
- Start the “Sauce”: While the pasta cooks, heat 2 tablespoons of the reserved oil from the sun-dried tomato jar in a large skillet over medium heat. Add the sliced garlic and cook for 1-2 minutes until golden and fragrant.
- Wilt the Spinach: Add the entire container of baby spinach to the skillet. It will look like a lot, but it will wilt down in 2-3 minutes. Stir until it’s fully wilted.
- Combine Everything: Add the chopped sun-dried tomatoes and the cooked, drained pasta to the skillet. Toss everything together. Add a few tablespoons of the reserved pasta water to create a light, glossy sauce that coats the noodles.
- Finish with Cheese: Remove from the heat and stir in the crumbled feta or goat cheese. The residual heat will soften it slightly. Season with salt and pepper and serve immediately.
Pro Cooking Tips
- Use the Tomato Oil: The oil from the sun-dried tomato jar is infused with incredible flavor. Don’t throw it away use it as the base for your sauce.
- Fresh Pasta is Faster: While you can use dried pasta, fresh pasta’s quick cooking time makes it ideal for a true 15-minute meal.
- Don’t Skimp on Pasta Water: This is the key to creating a sauce without any cream or butter. It emulsifies with the oil and cheese to create a perfectly coated pasta.
What to Serve With It
This dish is wonderful on its own. For added protein, you could stir in a can of drained chickpeas or some leftover shredded rotisserie chicken.
Storage and Reheating
Store in an airtight container for up to 3 days. Reheat in a skillet over low heat, adding a splash of water or olive oil to loosen it up.
FAQs about 15-Minute Meals
1. What to make for dinner in 15 minutes?
You have so many options! The key is to focus on quick-cooking components. Think skillet meals like our Garlic Shrimp & Asparagus, quick tacos with canned beans, pasta with no-cook sauces like pesto or simple stir-fries. Omelets, scrambles, and loaded quesadillas are also fantastic 15-minute meals that are perfect for a quick and lazy dinner.
2. Is it normal to eat a meal in 15 minutes?
While it’s common in our fast-paced world, health experts generally advise taking a bit more time to eat mindfully. The “15-minute” part of these meals refers to the preparation and cooking time. We encourage you to take a full 20-30 minutes to sit down, savor your food, and digest properly. The beauty of a 15-minute prep time is that it gives you more time back to actually enjoy the meal you just made.
3. What are the quickest dinners to make?
The absolute quickest dinners often involve minimal cooking. Think loaded salads with rotisserie chicken, hearty sandwiches on whole-grain bread, or “snack plates” with hummus, pita, cheese, and fresh veggies. For cooked meals, anything that uses a single pan and quick-cooking proteins (like shrimp, fish, or ground meat) or plant-based proteins (beans, tofu) will be among the fastest. Our Black Bean & Corn Salsa Tacos are a prime example.
4. What is a quick lazy dinner?
A quick lazy dinner is all about maximum flavor for minimum effort. Our 5-Ingredient Sun-Dried Tomato & Spinach Pasta is the poster child for this concept. Other great ideas include a “kitchen sink” frittata using leftover veggies and cheese, a quesadilla with canned beans and cheese, or upgrading a simple can of soup with a swirl of pesto, a sprinkle of Parmesan, and some crusty bread.
Conclusion: Delicious Dinners are Only 15 Minutes Away!
As you can see, a busy schedule doesn’t have to sentence you to a cycle of boring meals or expensive takeout. With a little bit of planning and a pantry stocked with smart ingredients, a delicious, stress-free weeknight dinner is achievable for anyone. The secret isn’t in being a professional chef; it’s in having a reliable plan and knowing that the right ingredients can do most of the work for you. You have the power to transform your evenings from a frantic rush into a time of nourishment and enjoyment.
Which of these 15-minute meals will you try first? Do you have your own favorite quick dinner recipe? Share your thoughts and successes in the comments below! We love hearing from our community.
For more easy recipes, time-saving kitchen hacks and meal plans delivered straight to your inbox, be sure to subscribe to our newsletter!
Print
the Speedy Garlic Shrimp & Asparagus Skillet recipe
- Total Time: 15 minutes
- Yield: 4 servings
Description
A top-down, vibrant, high-resolution photo of the finished garlic shrimp and asparagus skillet. The shrimp are pink and perfectly cooked, nestled amongst bright green, crisp-tender asparagus spears. The dish is glistening with a light lemon-garlic sauce and garnished with freshly chopped parsley and a sprinkle of red pepper flakes. A lemon wedge sits on the side of the pan. The lighting is bright and natural, emphasizing the freshness of the ingredients. This dish is the definition of elegance and speed a perfect, healthy 15-minute meal that feels a little bit fancy.
Ingredients
Instructions
- Prep the Pan: Heat the olive oil in a large skillet or wok over medium-high heat. While it’s heating, ensure your shrimp are patted dry with a paper towel this is crucial for getting a good sear.
- Cook the Asparagus: Add the trimmed asparagus pieces to the hot skillet. Sauté for 3-4 minutes, stirring occasionally, until they are tender but still have a slight crispness.
- Bloom the Aromatics: Add the minced garlic and red pepper flakes to the skillet. Stir constantly for about 30 seconds until the garlic is fragrant. Be careful not to let it burn!
- Sear the Shrimp: Push the asparagus to one side of the pan and add the shrimp in a single, even layer. Let them cook undisturbed for 1-2 minutes per side. They’re done when they turn pink and opaque.
- Bring It All Together: Stir the shrimp and asparagus together. Remove the skillet from the heat. Squeeze the juice of half the lemon over the entire dish and add the lemon zest. Season generously with salt and pepper, garnish with fresh parsley, and serve immediately.
Notes
- Pro Tips: Don’t overcrowd the pan; cook in batches if needed. High heat is your friend for a quick sear. For a richer flavor, deglaze the pan with a splash of dry white wine after cooking the garlic.
- Serving Suggestions: Fantastic on its own for a low-carb meal. Serve over instant couscous or with a crusty baguette to soak up the sauce.
- Storage: Store leftovers in an airtight container in the refrigerator for up to 2 days. Reheat gently in a skillet over low heat.
- Prep Time: 5 minutes
- Cook Time: 10 minutes
- Category: Lunch & Dinner
- Method: Sauté, Skillet
- Cuisine: American, Mediterranean
Nutrition
- Serving Size: 1 serving (1/4 of the recipe)
- Calories: 235 kcal
- Sugar: 3g
- Sodium: 280mg (will vary based on salt added)
- Fat: 15g
- Saturated Fat: 2g
- Unsaturated Fat: 12g
- Trans Fat: 0g
- Carbohydrates: 6g
- Fiber: 3g
- Protein: 20g
- Cholesterol: 170mg

